
image source : medium.com
Integrate iOS SDK
The PayFort iOS SDK makes it faster and easy to build a perfect payment experience in your iOS app. PayFort offers powerful and customizable UI screens and elements that can be used out-of-the-box to collect your users’ payment details. We also expose the low-level APIs that power those UIs so that you can build fully custom experiences.
About the Software
Supported Platforms
PayFort iOS SDK is supported on all the apple devices running iOS 8 and above.
Localization
The FORT Mobile SDK supports both English and Arabic languages.
Screen Orientation
Portrait is the only orientation supported within the FORT Mobile SDK.
Supported Payment Methods
Through the first version of the FORT Mobile SDK, the Merchant has the ability to process a CREDIT CARD transactions only.
Supported Payment Options
The supported credit card payment options are VISA, MASTERCARD, American Express (AMEX), MADA and MEEZA.
Mobile SDK integration workflow
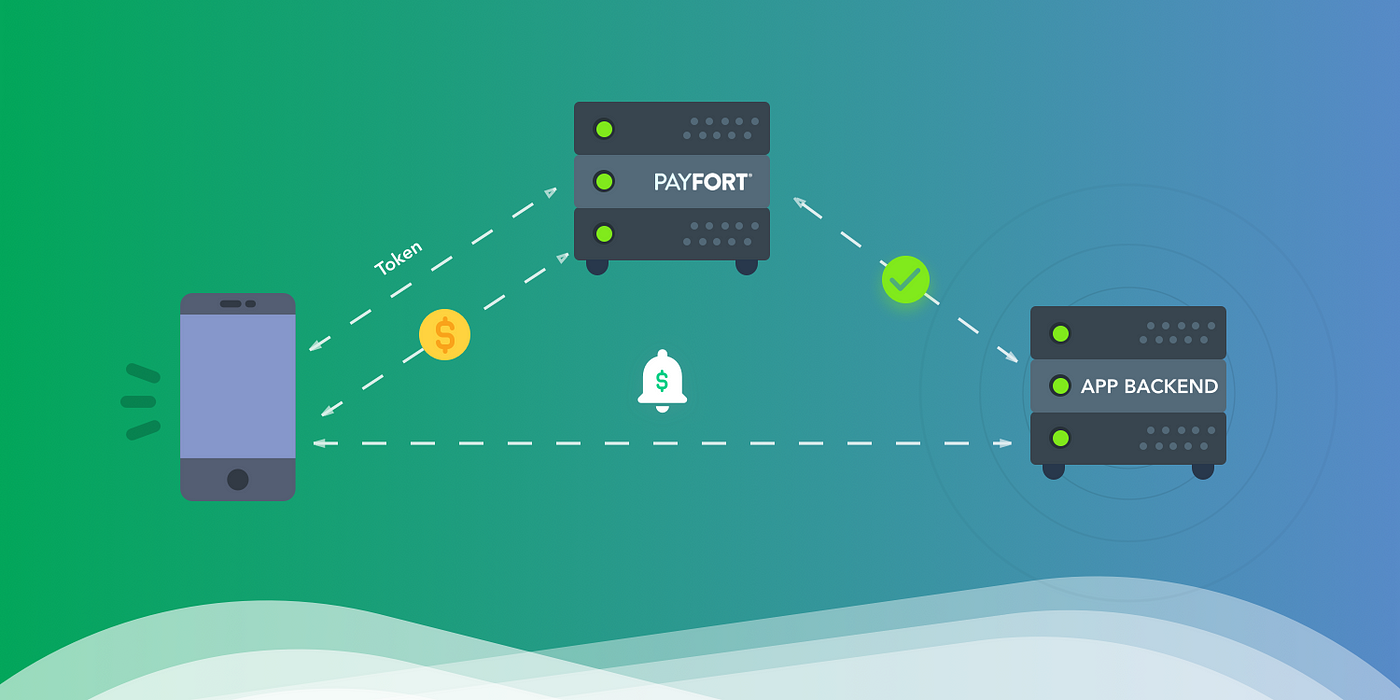
image source : medium.com
placeholder for Integration flow description and Integration flow diagram.
Project Setup
Include the PayFORT iOS SDK to your Xcode Project
The following steps describe how to setup an Xcode project for iOS development environment using the FORT iOS SDK. The prerequisites are the apple machine. You can chose to write the program either in Objective-C or in Swift programming which is the latest programming by the apple development community. The below steps describes the project setup for both objective-c and swift programming.
Placeholder: please provide pics for every step described in this section.
- Download the sdk from this link and extract it.
- Drag the PayFortSDK.framework & PayFortSDK.bundle to Frameworks in Project Navigator.
- Create a new group Frameworks if it does not exist:
- Choose Create groups for any added folders.
- Make Sure to select Copy files if needed.

-
Set -ObjC in the Other Linker Flags in the Target → Build Settings Tab.
-
For Swift Projects add the following code In your Bridge-Header.h:
#import <PayFortSDK/PayFortSDK.h>
</dict>element
<key>NSAppTransportSecurity</key>
<dict>
<key>NSAllowsArbitraryLoads</key><true/>
</dict>
(void)applicationDidEnterBackground:(UIApplication *)application {
__block UIBackgroundTaskIdentifier backgroundTask; backgroundTask =
[application beginBackgroundTaskWithExpirationHandler: ^ {
[application endBackgroundTask:backgroundTask];
backgroundTask = UIBackgroundTaskInvalid; }];
func applicationDidEnterBackground(_ application: UIApplication) {
var bgTask: UIBackgroundTaskIdentifier = 0
bgTask = application.beginBackgroundTask(expirationHandler: {
application.endBackgroundTask(bgTask)
bgTask = UIBackgroundTaskInvalid
})
}
Installation of PayFORT SDK
When you register for Payfort, you will receive separate keys for testing and production environment.
Placeholder: please provide pics for every step described in this section.
-
Import the PayFort Library.
#import <PayFortSDK/PayFortSDK.h> -
Initialize PayFortController with targeted environment, You set the target environment by setting one the two ENUM KPayFortEnviromentSandBox or KPayFortEnviromentProduction.
-
Objective C
PayFortController *payFort = [[PayFortControlleralloc]initWithEnviroment:KPayFortEnviromentSandBox];
-
Swift
let payFort = PayFortController.init(enviroment: KPayFortEnviromentSandBox)
-
-
Set Dictionary contain all keys and values for SDK.
- Objective C
NSMutableDictionary *request = [[NSMutableDictionary alloc]init];
[request setValue:@“10000” forKey:@“amount”];
[request setValue:@“AUTHORIZATION” forKey:@“command”];
[request setValue:@“USD” forKey:@“currency”];
[request setValue:@ “email@domain.com” forKey:@“customer_email”];
[request setValue:@“en” forKey:@“language”];
[request setValue:@“112233682686” forKey:@“merchant_reference”];
[request setValue:`SDK TOKEN GOES HERE` forKey:@“sdk_token”];
[request setValue:@“” forKey:@“payment_option”];
[request setValue:@“gr66zzwW9” forKey:@“token_name"];
Swift
let request = NSMutableDictionary.init()
request.setValue(“1000”, forKey: “amount”)
request.setValue(“AUTHORIZATION”, forKey: “command”)
request.setValue(“USD”, forKey: “currency”)
request.setValue(“email@domain.com”, forKey: “customer_email”)
request.setValue(“en”, forKey: “language”)
request.setValue(“112233682686”, forKey: “merchant_reference”)
request.setValue(“token” , forKey: “sdk_token”)
- Call PayFort and Response callback
Objective C
[payFort callPayFortWithRequest:request currentViewController:self
Success:^(NSDictionary *requestDic, NSDictionary *responeDic) {
NSLog(@“Success”);
NSLog(@“responeDic=%@”,responeDic);
}
Canceled:^(NSDictionary *requestDic, NSDictionary *responeDic) {
NSLog(@“Canceled”);
NSLog(@“responeDic=%@”,responeDic);
}
Faild:^(NSDictionary *requestDic, NSDictionary *responeDic, NSString *message) {
NSLog(@“Faild”);
NSLog(@“responeDic=%@”,responeDic);
}];
Swift
PayFort.callPayFort(withRequest: request, currentViewController: self,
success: { (requestDic, responeDic) in
print(“success”)
},
canceled: { (requestDic, responeDic) in
print(“canceled”)
},
faild: { (requestDic, responeDic, message) in
print(“faild”)
})
SDK - Response
Once you send your SDK request to PayFORT you will receive a response which will be a dictionary which displays the request parameters being sent in addition to the status, response message and response code.
The response(along with message success, failed or cancelled) will be already in the registered call back handler. The response can be viewed in the log as shown below for both objective C and swift programming:
Objective C
[payFort callPayFortWithRequest:request currentViewController:self
Success:^(NSDictionary *requestDic, NSDictionary *responeDic) {
NSLog(@“Success”);
NSLog(@“requestDic=%@”,requestDic);
NSLog(@“responeDic=%@”,responeDic);
}
Canceled:^(NSDictionary *requestDic, NSDictionary *responeDic) {
NSLog(@“Canceled”);
NSLog(@“requestDic=%@”,requestDic);
NSLog(@“responeDic=%@”,responeDic);

}
Faild:^(NSDictionary *requestDic, NSDictionary *responeDic, NSString *message) {
NSLog(@“Faild”);
NSLog(@“requestDic=%@”,requestDic);
NSLog(@“responeDic=%@”,responeDic);
NSLog(@“message=%@”,message);

}];
Swift
PayFort.callPayFort(withRequest: request, currentViewController: self,
success: { (requestDic, responeDic) in
print(“success”)
print(“responeDic=(responeDic)”)
print(“responeDic=(responeDic)”)
},
canceled: { (requestDic, responeDic) in
print(“canceled”)
print(“requestDic=(requestDic)”)
print(“responeDic=(responeDic)”)
},
faild: { (requestDic, responeDic, message) in
print(“faild”)
print(“requestDic=(requestDic)”)
print(“responeDic=(responeDic)”)
print(“message=(message)”)
})
If you do not want to investigate logs for response message you have the option to show response in the view directly in an elegant manner by displaying the response results as success or failed. You can check the sample code in objective c and swift programming to display the response message as shown below:
Objective C
PayFort.IsShowResponsePage = YES;
Swift
PayFort.IsShowResponsePage = true;
Hidden PayFort loading
There is an option to hide loading view when SDK initializes the connection request. You can disable the loading view by setting HideLoading option to yes or true as shown in the sample code. If you are using Objective C then you have to set it to yes and if you are using swift you have to set it to true. Please refer to below piece of code.
Objective C
PayFort.HideLoading = YES;
Swift
PayFort.HideLoading = true;
Custom Payment Designing
The payment view is what your customer will see when they open your merchant app on their cellphone and payment view will help them to make payment through your application. You can create your own custom UI theme for the payment view by the following ways:
- Create your nibFile .xib and set the name of Arabic xib same name with English one with suffix -ar.
- Link the xib with PayFortView and bind all the IBOutlets in interface section as shown in the code example below
IBOutlet UILabel *titleLbl;
IBOutlet UIButton *BackBtn;
IBOutlet UILabel *PriceLbl;
IBOutlet JVFloatLabeledTextField *CardNameTxt;
IBOutlet JVFloatLabeledTextField *CardNumberTxt;
IBOutlet JVFloatLabeledTextField *CVCNumberTxt;
IBOutlet JVFloatLabeledTextField *ExpDateTxt;
IBOutlet UILabel *cardNumberErrorlbl;
IBOutlet UILabel *cVCNumberErrorlbl;
IBOutlet UILabel *expDateErrorlbl;
IBOutlet UISwitch *savedCardSwitch;
IBOutlet UIButton *paymentBtn;
IBOutlet UILabel *saveCardLbl;
IBOutlet UIImageView *imageCard;
Placeholder: please provide UI flow diagram alongwith iphone screenshot for the same.
- Assign new created xib file to PayFort Controller.
[payFort setPayFortCustomViewNib:@“PayFortView2”];
PayFORT iOS SDK Operations
Once you have done the project setup and installation, you will be performing the Operations for authorization and purchase done through mobile application. These operations helps your mobile application to process Authorization and Purchase operations. You will be sending the request parameters in your code which will be sent to the PayFORT server and your application will receive response from the PayFORT server.
Placeholder for operations' ios sample code.
Placeholder for sample response from the PayFORT server.
You can check out the request and response parameters by visiting this link.
Go to Full API
Check out our full API by visiting this link
Need further help?
Thanks for using PayFort.com. If you need any help or support, then message our support team at support@payfort.com.